
General
AR Designation Explained
Bolt Grades
Canadian Engine Numbers
Emergency Radiator Filling
Infrared (IR) Thermometer Guns
Must Take Items on Long Runs
Rain-X
Rattles Under The Bonnet
Specifications for the Model A
Screwdriver blade types
Starting Procedure
Tight Nuts & Cotter Pins
Starting Procedure
(Distributors/Timing: : Held at A & E Jeffree’s home 12/12/10)
Two aspects of starting procedure and efficient running of a Model A came out of the discussions on the day.
- Where do you have the spark lever for starting and running?
- What does the mixture screw do (choke rod) and where should you turn it to for starting and driving?
Below I have listed the starting procedures from the original Model A Handbook which came with each new Model A, but first a couple of explanations.
The spark lever is there to control the spark (advance, retard) so that in the case of a back fire while starting, it protects the starter from damage or destruction. Ford vehicles after 1931 had advance and retard built into the distributor and the spark lever was no more!
The mixture screw/choke rod has two tasks:
Firstly as a choke: when pulled up it provides extra petrol to the engine for starting. It shouldn’t be needed again after the cold start.
Secondly, turning this rod controls the amount of fuel that gets into the carburettor once started. If it is too closed (lean/clockwise) the engine will not perform well, and may stop if the carburettor is in good condition. Running too lean will damage your engine valves and cause overheating. If too far open (rich/anti-clockwise), the engine runs rich consuming more petrol than needed, and your exhaust will belch black smoke and your vehicle will not run nicely!
Son Darren has an oxygen sensor fitted to his Woodie, with flashing red, amber and green lights. This tells him where the mixture screw should be for an efficient mixture. If you have moved the mixture screw it instantly changes the light readings. You need to use trial and error on your mixture to find where your car performs best, with little variations at a time. The best running should be with the mixture screw somewhere near one quarter turn open.
Starting procedure as in the original manual:
- Turn the switch key to the right.
- See that the spark lever is retarded (up), the throttle lever advanced (down three or four notches) on the quadrant, and the gear lever is in neutral position.
- If the engine is cold, turn the carburettor mixture screw one full turn to the left (anti-clockwise), to give a richer mixture for starting. This rod serves both as a choke for starting and as an adjustment. Next pull up the rod, at the same time pressing down on the starter button, and release the choke rod; next advance the spark lever. When the engine warms up, turn the choke rod back to its normal position one quarter turn open (clockwise).
It should be mentioned that after 80 years of use, our carburettors will have varying amounts of wear, and one quarter open and one full turn open could vary somewhat! On both of my Model As, I open the mixture screw about one half turn (anti-clockwise) for starting cold and turn it back to about a quarter open after a few minutes.
One of the regular things we all forget is to retard the spark when starting! Just remember up/start or get into the habit of pushing this lever up in your stopping procedure.
Alan Jeffree, Western Model A News, Feb 2011
Top of page
Must Take Items on Long Runs
- Basic tool kit & crank handle
- Water pump packing
- Spare water pump if you have one
- Points & condenser
- Spare distributor if you have one
- Manifold gasket (good copper ones)
- Head gasket
- Fan belt
- Fuses
- Timing gear
- Starter Bendix spring & replacement bolt & tab set
- A set of front wheel bearings, they can be a used set
Peter Sartori, Western Model A News, April 2016 & March 2018
Top of page
Emergency Radiator Filling
Overheating of the Model A cooling system may occur for a variety of reasons including the loss of coolant. Some owners will carry a container of water or special coolant however many do not. If you are unable to drive, or do not wish to drive, to a source of water or coolant, then the following hint may be of assistance.
Obtain a large strong plastic bag or two capable of holding say 6 or more litres of water. Plastic bags used for crushed ice or from parts suppliers are ideal. Keep this empty bag or bags in your tool kit. The bag can then used to carry water from the nearest source back to your Model A.
The capacity of a standard Model A cooling system is approximately 2.5 gallons (11 litres) and hence 6 litres or more will be sufficient to at least replenish lost coolant and enable the owner to drive to the nearest source of coolant. If you have a second bag, this can be filled and tied off using say adhesive electrical tape and then carried as back-up. (We all carry a roll of electrical or duct tape in our tool kit??). As always observe the normal precautions when adding cool water to the Model A radiator cooling system. On his last trip to America, Steve Read, noted that this technique was in use with special bags provided by automotive suppliers with all the normal precautions printed on the bag.
John Moorehead, Western Model A News, Jan 2018
Top of page
Rain-X
With winter approaching several members have found a product called RAIN-X. It is sold at all good car parts stores. It is a liquid which you rub onto a windscreen so you can see the way ahead without needing to use a windscreen wiper. Instructions are on the bottle. It also means your passenger can see when it is raining.
Alan Jeffree, Western Model A News, April 2012
Top of page
AR Designation Explained
Production of the Ford Model A commenced late 1927 with the final production ending March 1932 presumably to complete orders for the 1931 model. If the Model A Ford Service Bulletins are examined it will be noted that numerous changes were made to the Model A over the production period.
Whilst Ford never catalogued a “Model AR” it is generally known that it is a very early Ford Model A with several notable differences from vehicles built from mid 1928 through to the end of production. The designation results from an “R” suffix on parts that are particular to the early vehicles. The suffix means “Replaced” and it was applied only after those early parts had been superseded. The superseded parts were incorporated at different times so there is no one definition of what constitutes an “AR”. Over the years some restorations may contain a mix of early and late parts.
Perhaps one notable example is the difference between initial 21 inch wheels and brake drums. The early drums have a part number A-1125-AR and the new drums A-1125. These are not interchangeable with the wheels…
In the 1950s and 1960s the designation “AR” was adopted by restorers and the like to identify an early Ford Model A.
Confusing isn’t it !!!
John Moorehead, Western Model A News, Nov 2016
Top of page
Screwdriver Blade Types
A previous Tech Tip dealt with using the right wrench to get a good grip on a nut or bolt when you need to apply a lot of torque (twist) to break it loose, or to fasten something well. Today we talk about something similar, when you need to apply a lot of twist to a plain slotted screw. If you use the right tool, you will loosen the screw and be happy. But all too often the tip of the screwdriver just chews up the slot in the screw. It‘s not you, it’s the screwdriver.
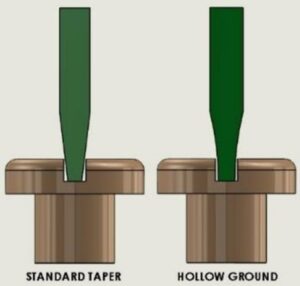
The most common screwdriver sold today has a “standard taper” tip. It’s kind of a “one size fits all” design. It does not really fit in the screw slot very well, and when you twist it hard, it climbs up out of the slot with what is known as “cam action”. The harder you twist, the more the screwdriver tip wants to climb up out of the slot, taking metal with it. Pretty soon you have a screw that you can no longer get a good grip on to remove.
A much better screwdriver tip design, very popular with gunsmiths (because they need to apply a lot of torque to slotted screws without chewing them up) is called a “hollow ground” tip. These screwdrivers are precision ground so that the tip going into the screw slot has two very well formed, parallel sides that fill up the screw slot for a nice tight fit that you can really apply some torque to!
Hollow ground screwdrivers are sold in a wide assortment of tip widths (to match the length of the slot in the screw head) and tip thicknesses (to match the width of the slot). When you have a good assortment of them, you can carefully select the screwdriver with the tip that best fits the screw slot in both length and width.
I do not have room for a large collection of individual screwdrivers, so I bought myself a nice gunsmith screwdriver set in a case. It has many hollow ground tips of various widths and thicknesses, so I can find the one that best fits the screw I am dealing with. Armed with these hollow ground tips and some penetrating oil, you should be able to break loose and refasten any screw you come across.

Until next time, Have a Model A Day!
Jim
Jim Cannon, MAFCA, June 2022
Top of page
Tight Nuts & Cotter Pins
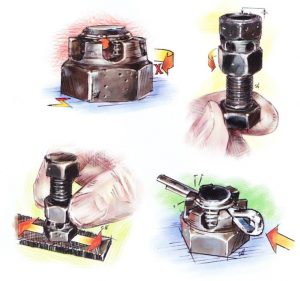
Would you like to be able to turn a nut tightly and still have the cotter pin fit? Here is how.
Select a bolt the same size and thread and put a nut on it. Place the castle nut, the one you are trying to make fit tightly, on the bolt with the castle side on first. Leave a few thousands of an inch beyond the end of the bolt and tighten the other nut against the castle nut.
Place a flat file on a flat surface and file the bottom of the castle nut. Take off only a few thousands, then try it. For a bolt with 20 threads per inch, moving the hole by half of a slot is about 4 thousands of an inch (.004 inches).
Determine how much to remove by knowing the number of threads per inch and observing how much off the cotter pin hole is from fitting. For a 7/16-20, like for the fan shaft of the water pump, one turn of the nut is .050 inches.
If you are off by one-half of a castle slot and there are six slots, then you are off by 30 degrees, which is equal to 1/12 of a turn, which equals 50/12 or about 4 thousands (.004 inches). For any bolt for moving the hole by half of a slot, just divide 1 by the (threads-per-inch x 12).
George Sage, The Restorer Jan/Feb 2022 as reprinted in Western Model A News, July 2022
Top of page
Bolt Grades
The following video is an interesting and informative expose about bolts and bolt threads:
https://youtu.be/fhrBYBiSFKQ
And the following very interesting comments on the video appeared in the North Island Model A Ford Club newsletter of Jan/Feb 2022:
“An interesting part is where he explains, using a stretchy rubber bolt, that a fastener is a very stiff spring. For Model A head studs, this has an interesting application. Original studs were about grade 5 (Ford made their own bolts long before SAE grades were invented).
One constantly hears that grade 8 are better. However, the tiny elastic stretch that 55 lb-ft torque puts into the stud is greater for grade 5 than grade 8, which is stiffer, harder, more brittle and tougher. So when settlement of a new head gasket takes place, some of the spring stretch in the stud is lost. The grade 5 stud, with more residual stretch left in it, will keep the gasket joint tighter than the grade 8 before (and if!) they are re-tightened.
Expansion and contraction with heat is met with the same factors. The grade 5 has more stretch tension and leeway than the grade 8, if the fit loosens as things heat up. Whether or not things loosen or tighten with heat, depends on the relative expansion rates of the threaded and unthreaded clamped parts and is very relevant where aluminium and iron parts are mated.
Lastly, a BEST graphite head gasket squashes less than a copper composite one. For copper composites, grade 5 with more elastic stretch is safer than grade 8. For graphite, grade 8 is ok, but there is much more chance of pulling the softer cast iron threads out of the block, with grade 8 than grade 5.
There are other factors in favour of grade 5 than grade 8 on original blocks too. “
Stuart Jordan, North Island Model A Ford Club as reprinted in Western Model A News, August 2022
Top of page
Rattles Under The Bonnet
Very few things are as annoying as a persistent rattle under the bonnet while you drive your Model A. Of course it stops when you pull-over and look under there! Here are some things that I have found over the years can sound like a rattle under the bonnet:
The radiator support rods. They come loose at the radiator or at the firewall. (Ed’s note – the source of my recent rattle – that I thought was inside the cabin.)
The engine pans. Just one loose bolt/nut can rattle like crazy (hard to find).
Bonnet support/prop brackets. The ones that “fold in” will rattle if closed all the way; open it back up ½” to separate the halves from touching.
Brake rods. Jiggle them by hand. You may need to install some of the over size clevis pins to tighten things back up, or replace the return/anti-rattle springs.
Tools and things under the seat. (I found a large screwdriver once in my side curtain pan, way in the back, that was causing a rattle that I chased for 2 years!)
I hope this helps you track down that annoying rattle. In a future Tech Tip, I will cover potential sources of other annoying noises in your car.
Until then, “Have a Model A Day!”
Jim
Jim Cannon, MAFCA as reprinted in Western Model A News, June 2022
Top of page
Infrared (IR) Thermometer Guns
These little IR thermometer guns are amazing. I use mine to check coolant temperature at the outlet of the engine, look for cool spots on radiators, check tire sidewall temperatures, and to see if all of my brake drums are at about the same temperature after a hard brake (to confirm even braking action at each wheel).
If you are going to get a reliable, consistent, and reproducible reading with these guns, you need to understand a bit about how they work. When you aim the gun at something and press the button to read the temperature, the gun reports to you the average temperature of everything within its “Field of View”.
If you want to read the temperature with a spot circle diameter of ½“ (a very handy size), you must hold the gun 6” from the object. I have seen some guys hold the gun several feet from a radiator hose and not understand why the reading is so low; their 3” diameter spot circle includes a lot of cool air on either side of the radiator hose. Get in the habit of holding the gun up close to the object for the best readings.
Some guns have a laser pointer built in that helps you see where the temperature readings are being taken. The laser does not read the temperature, it just helps you see where the reading is from. You have to visualize the spot circle size, depending on how far the gun is from the object.
I hope this helps you get more out of your IR thermometer. If you don’t have one, they are handy to have around the shop and on the road.
Until next time, Have a Model A Day!
Jim
Editor’s Note:
The measuring area (or “spot”) of an IR thermometer is a circle. The thermometer averages the temperature of everything in the circle. So if your spot is too big, you will be measuring the temperature of “stuff” you don’t want to be included in the measurement. The target to be measured must be bigger than the spot size.
The “Distance-to-Spot Ratio” (D:S) of an IR thermometer tells you how big the spot is at any distance from the thermometer. For a D:S of 12:1, this means the measuring spot is 1” in diameter at a distance of 12”, 2” at a distance of 24”, or 1/2” at a distance of 6” etc.
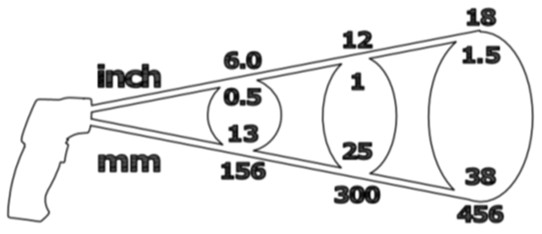
Spot sizes and distances for a 12:1 thermometer
The higher the ratio, the smaller the measuring area (spot) is at any given distance – meaning you can measure something from further away.
Infra red thermometers are available in a variety of “Distance-to-Spot Ratios”. 12:1 is a common ratio, my unit is 13:1.
Note that the size of the visible laser spot is NOT the size of the measuring spot (the laser spot is typically much smaller than the measuring spot).
Jim Cannon, Script A News, Feb 2026 as reprinted in Western Model A News, March 2026
Top of page