
Cooling System
Coolants
Engine Water Outlet Mounting Lugs
Types of Fans (to avoid!)
Fan Failures
Fan Removal
New Hose Installation
Radiator Bolt Installation 1
Radiator Bolt Installation 2
Bending the RadiatorOverflow Tube Back
A Thermostat in a Model A
Types of Fans (to avoid!)
A problem which some members are aware of is the Model A fan. Members new to the movement may not be aware of the potential disaster when they destruct. Original fans can be a two blade or a four blade. Both of these can be a potential disaster. The original two blade is made with two separate metal layers joined to make one which has some air space between them. This space captures moisture and over the eighty years, rust and vibration have weakened the metal. Eventually with use, one end of the blade will detach. This flying piece can destroy the radiator, badly damage the bonnet or harm you if you happen to be working on the engine bay with the engine running. Not often, but over the years a few of our Club members have had their fan cause damage.


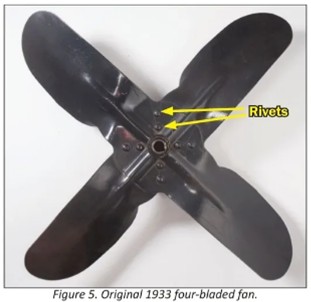
The original four blade fan can also be a disaster. It has two separate metal blades which have four steel rivets holding it together. The problem here is that over the years the vibration has cracked one or several of these rivets and it is only a matter of time before they let go and the two blades fly around inside the closed bonnet doing lots of damage.

The above photos were taken off Facebook. I also read on Facebook of a Model A owner in the USA who had an after market single blade aluminium fan throw a blade. He did state that it had been in service since 1980 and suggested that the early reproductions perhaps weren’t as well made as today’s.
Suggestion to avoid:
Keep an eye on your fan and look for cracking or loose rivets and avoid turning your engine by the fan.
I always balance my fan regardless of which fan I use (original or reproduction). I haven’t used a four blade but used an original two blade for 20 years and now both of my Model As have reproduction two blades.
Place two equal height small angle iron pieces on a levelled, stable surface and place the water pump shaft with fan attached, on them. File a small amount off the end of the heavy blade end until the assembly stays in the position you place it (it no longer turns to the heaviest blade). I did find filing off an original, lead to me having to oxy weld the two metal layers on that end back together, dress the weld and file some more!

The fan needs to be bolted on securely. I didn’t have a fan handy for this photo.
Alan Jeffree, Western Model A News May/June 2015
Top of page
Fan Removal
The taper lock between the water pump shaft and the fan may result in difficulty in removing the fan from the shaft. Pullers and knock off tools are available but the following technique may be used to remove the fan.
After removing the split pin and nut, thread a standard 7/16th inch 20 TPI (UNF) hexagonal nut onto your shaft about half way into the nut. Screw a 7/16th inch 20 TPI bolt about one inch in length into the nut and hard against the end of the shaft.
Holding the fan blade centre boss by hand give the head of the bolt several taps with a hammer and the fan should come free. If it is stubborn then application of heat using a hot air gun to the centre boss should allow to fan to come free.
John Moorehead, Western Model A News Aug 2013
Top of page
New Hose Installation
Heat takes a toll on the radiator hoses, especially the upper hose. The radiator hoses on a Model A can be a pain to install, particularly the lower ones with the pipe. Here are a few tips I have picked up to make the job easier.
Use a lubricating, non-hardening sealant inside the hose ends to make it easier to slide them on to the engine and radiator necks, and easier to move them around when you need to. The best one that I have found is called Hylomar AF. A thin coating inside the hose helps it slide around when installing, and will also make it easier to remove in the future.
On the lower pipe, install one short hose on each end of the pipe and secure each with a clamp. Estimate where you want the hoses to be, but be prepared to move them later after a trial fitting. Slide the hose end first on to the radiator outlet at the bottom and slide it far forward. Then work the other end’s hose over the cast iron water inlet and slide up. Feel through the hose to find the bead on the inlet and clamp on the engine side of the bead. Then tighten the clamp at the radiator.
The upper hose uses a similar technique. Slide the hose first down on the cast iron engine gooseneck. Carefully work the other end over the radiator inlet and slide it up. Then position the hose clamps near the end of the hose and tighten them.
Do not over tighten the hose clamps, especially the ones on the radiator. If you do, you can buckle and crush the thin brass, and you will cut into the hoses. You should not have to make the clamps too tight if you use some sealant. Start out with them just snug and then only tighten more if coolant drips from the hose when the system is full.
After driving a few times, go back and check the clamps, snug them up a bit if needed.
That’s it!
Have a Model A Day!
Jim Cannon, MAFCA, Western Model A News July 2020
Top of page
Engine Water Outlet Mounting Lug Damage
The water outlet at the front of the head is secured by the two head studs and hence the nuts are tensioned to 55 ft.lbs. It is not uncommon for one of the two mounting lugs to crack during the tightening of the securing nuts. The main reason is that the thick paper gasket supplied by some companies results in uneven forces at the ends of the outlet lugs. The section of the gasket beneath the lugs is compressed. The section in the centre of the gasket remains thicker. Originally Ford used a composite copper gasket for this application.
There is an easy way to prevent cracking of the mounting lugs and that is to machine or file the mounting surface of the outlet perfectly flat. Then using a mill file, file the mating boss on the head flat. You can then use a thin paper gasket and good quality sealant (sparingly) to fit the outlet without the fear of damaging the mounting lugs, or just use the sealant without any gasket at all.
Whilst other techniques may be employed, such as extra packing under the ends of the lugs to provide an even support, the above method has been found to work well.
John Moorehead, Western Model A News March 2018
Top of page
Coolants
At the time the Model A was manufactured, water with maybe some soluble oil was the coolant in common use. Water has excellent heat transfer characteristics, however corrosion products (particularly with ferrous metals) is a problem.
Over the years manufacturers have developed specialised coolants with various additives for the vehicle engine/radiator cooling system. There are two types of coolants:
- Type A Coolants with inhibitors, anti-freeze, anti-boil additives based on water and glycol.
- Type B Coolants typically has no anti-freeze or anti-boil performance and are essentially inhibitors only.
More recently the formulations of the coolants have changed to take into account the amount of aluminium or similar alloys used in modern vehicles. One of the additives is identified as OAT (Organic Acid Technology) which works well in late model cars. However this product may not be suitable for older cars, say greater than 10 years old. In vehicles such as our Model A, these new additives may attack the gaskets and gasket cements. Also it has been found that the acid coolant may actually destroy soldered joints in the older type radiators.
The solution for our older cars, is to use a product with IAT (inorganic acid technology) if anti-freeze performance is required. In WA, the requirement for anti-freeze is not usually an issue. Some manufacturers supply a coolant for older vehicles eg, Penrite Classic Coolant and Nulon Ultra Kool for pre-1984 vehicles. If required, these coolants should always be prepared with demineralised water. The main performance characteristic of these products is as a coolant and inhibitor to prevent corrosion. The high percentage of water ensures maximum heat transfer.
John Moorehead, Western Model A News Aug/Sept 2018
Top of page
Radiator Bolt Installation 1
When installing the radiator, it is very hard to hold the bolts in the hole above the spring while you fit the rubber pad and drop the radiator in place.
I cut new pads out of some insertion rubber the same size as the original. I then punch a slightly undersized hole for the bolt in the rubber. The bolt can the put through the hole and pushed through the rubber. The pad will hold the bolts in position while you fit the radiator.
Ron Andrews, Western Model A News Feb 2020
Top of page
Radiator Bolt Installation 2
When installing a radiator, Ford’s Service Bulletins reminds you:
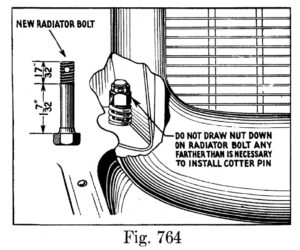
DO NOT DRAW RADIATOR BOLT NUTS DOWN TIGHTLY
When mounting a radiator do not draw the radiator bolt nuts down any farther than is necessary to lock the nut with the cotter key. If these nuts are drawn down tightly it compresses the radiator to frame bolt springs to such an extent that the flexible feature of the springs is defeated and damage to the radiator invariably results. Recently the threaded end of the radiator bolt was reduced from 5/8” to 17/32” which makes it impossible to screw the nut down farther than the correct distance. See Fig.764. However, as practically all cars are equipped with the former design bolts, constant care must be exercised when screwing down the radiator bolt nuts.
Jim Cannon, MAFCA, Western Model A News, April 2021
Top of page
Bending the Radiator Overflow Tube Back
The Ford Service Bulletins of April, 1930 (page 450) advise that if you have excessive coolant loss though the radiator overflow tube, you can bend the tube back toward the back edge of the radiator filler neck. They also mention soldering in a brass washer where the tube passes through the baffle plate.
To bend the tube, insert a larger Phillips screwdriver into the tube. You want the smooth shaft of the screwdriver to pretty much fill the tube, and don’t have the tip of the screwdriver go below the baffle plate, about 2 to 3 inches. Then gently push the screwdriver back away from you a bit, remove the screwdriver a bit (~½“), then bend it some more. Repeat until the top of the tube is as far “back” as it will go.

If you need to, you can add a short piece of rubber tubing to the top of the overflow tube to raise the level in the top tank that much more before the coolant starts going out the overflow. But don’t raise it too much or coolant will start leaking out of your radiator cap and make a mess on your paint and radiator shell.
I hope this helps.
Have a Model A Day! Jim
Jim Cannon, MAFCA, Western Model A News, Sep 2020
Top of page
“A” Thermostat in a Model A
That’s right! I’ve been using one for two years now and sure like it. Keeps my engine running at a constant temperature within five minutes after start-up. I have found that my crankcase oil won’t sludge up so fast, and it has a positive affect with less carbon build-up in the cylinder head. Water flow to the radiator is restricted somewhat and this helps prevent the upper tank overflow nuisance too. I use a Stant #S-336-160, 160-degree thermostat available at most (US) auto supply stores, a piece of lower radiator hose and some GE silicone glue.
After draining the cooling system, remove the upper hose, clean it out of all foreign matter, insert a piece of lower hose inside it and secure with silicone glue. Position the inner hose so it allows the outer hose to slip back into the original position it was in before you removed it. Next, take the thermostat, drill a couple of ⅛” holes in the outer flange approximately 180 degrees apart. This will allow water to flow back down when draining the cooling system. Then place the thermostat up against the inner hose, being sure to orient it properly so that flow is toward the radiator. By placing it at the lower end of the hose and butting it up to the cylinder head outlet neck, it will stay in position. Tighten all clamps and refill with coolant, check for leaks and enjoy.
Poco Quatros A’s, Script A News, October 2021, as appeared in the Western Model A News, May 2023
Top of page
Fan Failures
Fans fail each year. When a fan fails, the blades can damage the radiator, hood, engine … or worse. It might result in serious injury or even a fatality. MAFCA Facebook group members often publish posts or make comments about fans. But their comments demonstrate a misunderstanding about fan failures, at times providing incorrect information about fan failures. The fact remains that any current steel fan has a high failure rate. Facebook group members claim they regularly “inspect” their steel fan to prevent a failure. But inspecting a steel fan does not prevent one from failing. This article explains fan failures, and recommends ways to prevent them.
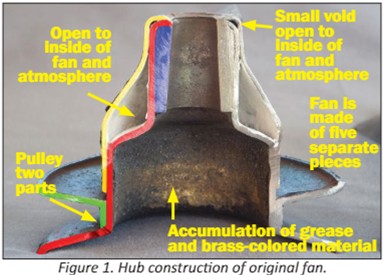
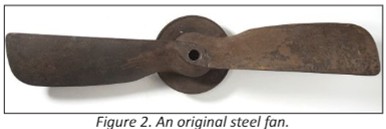
Original Fan Ford used a two-bladed steel fan from 1928 to the end of production in 1931. The fan consisted of two pieces of stamped steel. These two pieces of stamped steel were formed around a hub, welded around the edges, and spot riveted at the tips of each blade.
Figure 1 shows the construction of the hub. Figure 2 shows an original steel fan. Figure 3 shows the inside of an original fan blade and the spot rivet at the end of the blade tip. If one removes the weld around the edges, one can pry the fan blades apart and break the spot rivet on the end of the blade. Note the accumulation of rust on the inside of the fan blade. Typically, original fans have rust inside the blades.

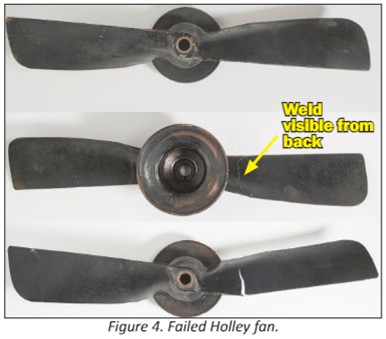
Holley Fan Ford had a cracking problem with the Model A fan, so in late July 1930 Ford engineers redesigned the fan. Also known as the “Holley”design, this fan used a single, stamped blade instead of the earlier two-stamped-blade model. Ford redesigned the fan to reduce the potential of blade failure. The fan retained the original hub construction, but the blades were not hollow. Ford welded the single blade fan blade near the hub. Figure 4 shows a Holley fan. This fan has a crack and has failed.
1933 Four-Bladed Fan In 1933, Ford introduced a four-bladed fan for their four-cylinder cars. This four-bladed design became the replacement fan for early and late fans. In this design, Ford riveted the four-bladed fan blades together. Figure 5 shows an original four-bladed fan. Reproduction four-bladed fan blades bolt together.
Aluminium Replacement Fan A two-bladed cast aluminium fan is available to replace the original steel, two-bladed fan. People use this fan because it looks like an original.
Plastic Replacement Fan Model A vendors sell a six-bladed plastic fan to replace the original two-bladed unit. This fan looks quite different from the original.
source not recorded (The Restorer ??)
Top of page